Tuesday, February 14, 2017

Cleaning for a New Direction

The work in the cockpit has taken a pause on account of the weather, I have been working inside where heat is easier to apply to the work area. My work shop is filled with epoxy type work and some of my projects are in the garage. I took the binnacle off Great Ketch and hung it from the beams in the garage. Note how it is suspended so that I need not require hunching over the project.


Objective: Clean the binnacle, remove the flaking paint, clean the throttle mechanism, repair any issues in the throttle/gear box, paint the aluminum parts, polish the stainless steel guard, lubricate moving parts, and add fluid to the compass.


The pictures show the areas where the paint starting flaking off the aluminum. When the paint is scratched, chipped, or worn then water can easily find its way between the metal and the paint. When water becomes trapped under the paint you can bet that corrosion will be the result. The best way to avoid the flaky popping bubble type of paint flaking is to try to prevent it from happening at all. Typically areas where metal has attachments points (Screws, bolts, or other) it is common for paint to be scrapped off or chipped. Once that tiny hole is available for water, its only a matter of time before water works is way under the paint.
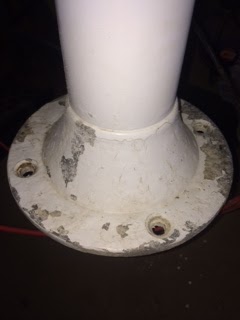

On Great Ketch, one can see the most damage at the base, where there were many dents, and scratches and on the plate, where water sat and found its way through tiny holes where screw holes were. I took a wire brush to the base and the paint flew off just from the breeze caused by the rotating wire spindle. Seriously, the paint was in very poor condition.


Removing the stainless screws that held the plate onto the binnacle post was a challenge. The screws where frozen in the aluminum mount and it required two days of penetrating fluid and large screw driver and impact driver to coax and tease the screws out. The key is patience and vibration.

Once the cockpit has been completed in the spring -- I will gel coat the entire area -- then the refreshed binnacle will be placed into the boat and cables connected.

These 33' cat ketches were originally designed for a tiller. Note how the transom hung rudder extends higher than the cockpit. Hull #1 has a tiller and I believe Hull # 2, The wheel was an option during the build from order.

The picture toward left shows the binnacle without the compass, compass mount, stainless steel support mounts, and the throttle and gear box. Once I have completed this project I shall post the final project.

Monday, January 23, 2017

Happy New Year 2017

Happy New Year 2017. 

Great Ketch has is on the hard and been getting much attention; all in the winter project category. These projects are separated into three main areas.

1) Cockpit Refresh: bodywork to fill dents, gauges, scratches, and voids, and sanding as part of preparation for a new spray gel coat finish – to be sprayed during the warmer months of spring. This project requires the most hours of labor. There is much sanding to be done, shaping, and prep work before any gel coat is applied. One can see the amount of voids the cockpit possessed. I suspect that these cat ketches were not vacuumed cured. Helm steering binnacle will be cleaned and painted where appropriate. 

2) Stanchions: two new stanchions were fabricated so that I can fix a gate on starboard and port side of Great Ketch; old stanchions will be refreshed. New lifelines and appropriate hardware.

3) Miscellaneous: these projects include, hot water removal clean and refixed, new thermostat and new hoses. cockpit locker bilge area to be cleaned and repainted, cockpit locker lids reinforced with fiberglass/epoxy and new vents for waste tank and propane locker, new shorepower electrical wire inside boat, replacement of 30amp shorepower plug with SmartPlug, and electrical work. Varnish work on cabinet door and cabin sole bilge panel.

Three areas of project work is plenty when one considers the amount of work required for any one specific task; therefore, my future blogs will address the different projects and progress made. This blog entry is to provide readers with advanced notice of the content to expect within the next few weeks. These projects will each be assigned their own blog posting. 


Although not a movie trailer, the pictures below represent part of the three project areas that are worked interchangeably and intermittently during the winter months.


Saturday, August 6, 2016

Holding Strong - Mantus Anchor Helps One Sailor to Sleep Better

What a difference an anchor can make in improving one's ability to sleep when spending a night on the hook.

I enjoy the experience of being on the hook during the night. Relaxed in the cockpit as the sun sets and feeling its warmth slowly temper to a calm coolness; laying on my back looking toward the glittering wonderment sparkled about the deep blackness, and the feeling with eyes closed of the gentle sway underneath my spirit; all has always been my enlightenment.


For years my Bruce anchor has treated me well, yet, I knew it was an old style designed anchor and my research has prompted me to purchase one of the new design anchors such as a Mantus anchor.

There is much information about the new design anchors compared to old style anchors, and readers must  form their own judgments pertaining to anchors. My intention is to not commence another anchor war debate - as there are many already about on the sailing forums - rather to share with readers my experience using the Mantus anchor.

A visible comparison of the old style and new style anchors is worth noting, and for myself, I see the difference plainly when I compare the design of the Mantus with the Bruce. The most obvious difference is the "roll bar." The Mantus has a "roll bar," and the Bruce does not.  The advantage of a roll bar is that it helps the anchor to set quickly. The negative of the roll bar is that it may pose a challenge for some pulpits when mounted.  My set up places the roll bar forward of the bow pulpit and avoids contention for space.


In order for the new Mantus to set well on my pulpit I purchased a Mantus bow roller.  The bow roller allows the Mantus to sit securely on the pulpit in the roller while placing the anchor forward of the pulpit. In the picture one notes the roll bar clear of the puplit and forward. Interestingly with humor, one of the fellow sailors in my marina thought the roll bar to be made as a handle so I can carry the anchor about easily -- It does make a nice handle, and that may have been a side benefit of the roll bar; however, I suspect it was not the primary reason to design such a "curve" appeal.

Setting the Mantus is very easy and she grabs quickly. My Bruce would drag slightly before finally setting; in contrast, the Mantus grabbed quickly, and, if it did drag it was too slight for me to notice.

In addition to the bow roller I added the optional Mantus mate. The mate hangs below the roller and offers additional stability to the anchor as well. The roller and mate are adjustable to accommodate different angle of bows and anchor placement. The system is a complete easy to install, easy to use, and easy to adjust system.

Conversations and emails with folks at Mantus Anchors was great. My emails were answered promptly, my calls always led to someone to speak about the product and related matters; moreover, they provided advice and ideas to mitigate any potential problems I might encounter in setting up the roller, mate, and anchor. Excellent customer service.

After several overnights on the hook,  I feel the Mantus has improved my boating experience; I look for more opportunities to anchor out overnight, I sleep better while on the hook, and am able to handle the gear easily with my manual windlass without issues.

Side Note - I have not had an opportunity to test the Mantus in winds over 20knots --- I am not a tester or reseller by profession, nor am I paid for my opinions and comments on any product in my blogs.

I am the first owner of a Mantus at my marina, and it has brought the attention of others. I have a hunch that others will be acquiring a Mantus anchor as well. Some have talked about purchasing a larger anchor and then stowing it apart and taking it out, -- connecting the parts together, the anchor plate to the shank, and then the roll bar-- for times when they may need more security. One of the nice things about the anchor is its ability to be taken apart for stow.


Picture toward left is of Great Ketch at anchor with the Mantus down below at the bottom of the lake, the Bruce anchor rests in its roller in the pulpit. This picture was taken at 6am in the morning.


Monday, May 16, 2016

2016 Launch

The slight hints of spring draws me with anticipation of sailing; the wind caressing across my skin, the smell of water, and the sparkle of sunlight dancing with broadway fashion of the New York City theatre district off the lake. Spring is where the beginning of life starts as the winter is nothing more than a retreat from having to mow the lawn. Oh sure, winter provides time to think about boat projects, and to save money for those boat projects, but when one is almost forced into a hibernation on account of freezing temperatures, little sunlight, and food exposure of the high carb kind, it is difficult to have the inclination of the sorts to feel like spring will ever take it turn. Kidding aside, winter does make the spring and summer so much more appreciative for us northerners that we do make the most of it during summer.


 Oh but brrrr,,,still winter months are nothing but the slow torture of denial for any sailor or wanna-be sailor. Those who share the slips in the marina with me must also endure looking at their boat on the hard; the loneliness of our boats sitting without a word or sound of their nature, no creeks, no pings of halyards against the mast, no howling of rigging, no flapping of sails, nothing,,, but silence.


Great Ketch waited more patiently than I, and she stood her ground under her tarp blanket. She had been tucked in during the month of October, and endured the cold days and nights. The frigid frost, snow, and rain made did not awaken her; rather,  only the warm spell in March that soaked across her bow did she call out.

The blanket came off, and her winter frame was removed. Enjoying the sun and warm days, she received a washing, polishing and waxing to good shine that she displayed a look of readiness. Alas...it wasn't long after her exposure to the sun when the cold winds came back to remind everyone that old man winter is alive and kickin'.

When I could, I would make my way to Great Ketch during the winter weekends to work on boat projects, I did remove a few cabinet doors to varnish, and other trim pieces as well (Another blog coming soon.)


It wasn't until the month April, after the first weekend that Great Ketch was was paraded to the launch by the travel lift and splashed down into the lake. Checking for leaks and priming the driplass before she was set afloat ensured a good beginning of the season. Starting the engine proved to effortless and the management and care of her engine was returned in the easy startup. Her Yanmar GM20 heart pumped healthy and smoothly


Every year, she performs such a ritual, and every year, it is new to me. A sailboat simple does not look like a sailboat until she is in the water. It is only upon boarding Great Ketch that the dreams of sunsets, morning sunrise, and waves feather against the hull does it feel like spring has truly come to be.

For some folks, a sailboat does not look like a boat until the masts are up and completely rigged; for me my initial satisfaction is when Great Ketch is in the water.


***** Future post will show the wood work, varnish of cabinet doors, sole varnish work, and trim work****

Wednesday, January 13, 2016

Transporting Masts

As part of my routine for preparing Great Ketch for winter storage as well as readying here for Spring time launch, I unstep and step the masts. 


To unstep the masts: The removal of the masts require the removal of two stainless steel rods at each mast located at the base its base. The rods prevent the mast from any upward movement -- in case of a knockdown, or roll. After the rods are removed and all wire connections have been disconnected from the mast, the mast boot is loosened. With the prep tasks completed, one merely wraps a thick line several times around the mast just below the gooseneck track and securely ties off the bitter end; the remaining line is connected to the hoop of the lifting crane. After both ends are secured, the cranking of the crane handle lifts the mast out of its plug and up it goes.


Transporting the masts on land: In order to move the mast from one location to another, I use a homemade dolly.  This dolly is made from wood purchased at local big box store, and the wheels are thin spoke style. The wheels make it easier for me to move about the boat yard. Using .5 inch metal rod as an axle the wheels are held on with two nuts locked together. 

Before I made the dolly, the mariner owner used a front loader to lift the mast and move it from one location to another. I thought it was a waste of his time to move the mast when it could easily be done by other means: the result is a simple dolly.  I have used the dolly every year, and learned that placing the dolly not at the end, but one third up from the base it is easier to lift and move the mast.


With the dolly strapped to the base end of the mast, one person can lift the other end of the mast and push it along. The Carbon/S-glass masts are not heavy, and make simple task for transporting by land -- without the aid of heavy equipment of multitude of men.

In the picture toward your right, one may note that the mast is riding on the dolly while a person lifts the other end. Moreover the viewer will note the flex in the Carbon/S glass mast -- an attribute that allows the mast to spill wind when its speed changes; thereby, acting as shock absorbers. The result is a smooth even heal ride when sailing. Great Ketch rides like a luxury yacht in shifty winds.


Transporting the masts on water: Another mode for transporting the masts is having them on the boat. When I purchased Great Ketch I needed to sail her on Lake Ontario on the New York State border to the canal entrance located in Oswego, New York. Transporting Great Ketch on our canal system made me feel like a modern Huckleberry Finn because there were many locations on the canal without any signs of civilization; just trees, bushes, and nature all about, 


The masts are placed on the center line of the boat and are supported by wooden frames. With straps securing the masts from rolling, -- I have no shroud branches to prevent the masts from rolling, but because the masts are elliptical they do not move much anyway  -- I am able to navigate the waterway with confidence. 


The viewer will note the calm waters, the peaceful sky line, and the seemingly never ending invitation of the waterway.  

To Step the Masts: Stepping the mast task is the opposite of unstepping the masts. Once the masts are lowered into the boat the Spartite ring on the mast ensures that the mast aligns exactly as it did upon their removal. The holes that the stainless steel rods are placed align accordingly.


Stepping and unstepping the masts is a two person operation, but having a third person is preferable. 

Why do I perform unstep and step the masts every year? The process allows me to clean, polish, wax and inspect the masts and all lights and hardware. The time and effort required to perform such a task is worth it. I also am able to wrap the masts in tarp tightly to protect is from the foul winter weather and UV. The masts are easy enough to move about and having them stored on wooden stands that are three feet high makes performing maintenance task easy.


Thursday, December 3, 2015

Great Ketch Under Cover

During the winter months in Central New York, USA, our boats are very exposed to the weather; snow, rain, ice, and winds can mix often enough to claim victory on many boat parts. At the marina where my boat is stored on the hard, there are boats with heat shrink wraps, with tarps, or cotton canvass -- few boats have no protective covers and those are the boats that appear to age quickly.

Five years ago, when I acquired Great Ketch, one of my first projects was to build a winter cover frame. Using EMT pipes and fittings, pipe cutter, and pipe bender, I was able to bend the pipe at a 60 degree angle and secure the pieces together. I had purchased numbered labels from somewhere to keep the assembly pieces in order upon reassembly of the frame; numbers were colored in blue for the starboard side, and red for the port side; black color was used for the backbone part of the frame.

After securing the frame to the stanchions, a purchased a tarp, -- I had used silver which lasted longer than white and blue, but did not allow sunlight to pass. I often work on the boat in the winter so a white tarp is best for me as it does allow sunlight to pass.


The tarp is replaced every two years, and I use the old tarp to cover bushes and plants during times where frost is apt to occur.


The tarp blocks rain and snow, which could develop into ice, from forming on the boat. The winter
sun is enough to melt the snow during the day, sometime more sometimes less. I appreciate having the winter cover during the winter because it allows me to work on the boat in a dry environment with a small heater inside the boat.

This winter, I have been sanding the wood work in the cabin in preparation for staining and varnish when the weather becomes conducive for such work. Another post will be made about the winter sanding and varnish work.


Monday, June 8, 2015

Half Wishbone Booms Get Attention

Great Ketch is a free standing mast cat ketch. The masts are carbon fiber and fiber glass.


The booms are fiber glass and contain inner blocks in areas where strength is needed, such as at the end of the boom where the lines connect to the boom.

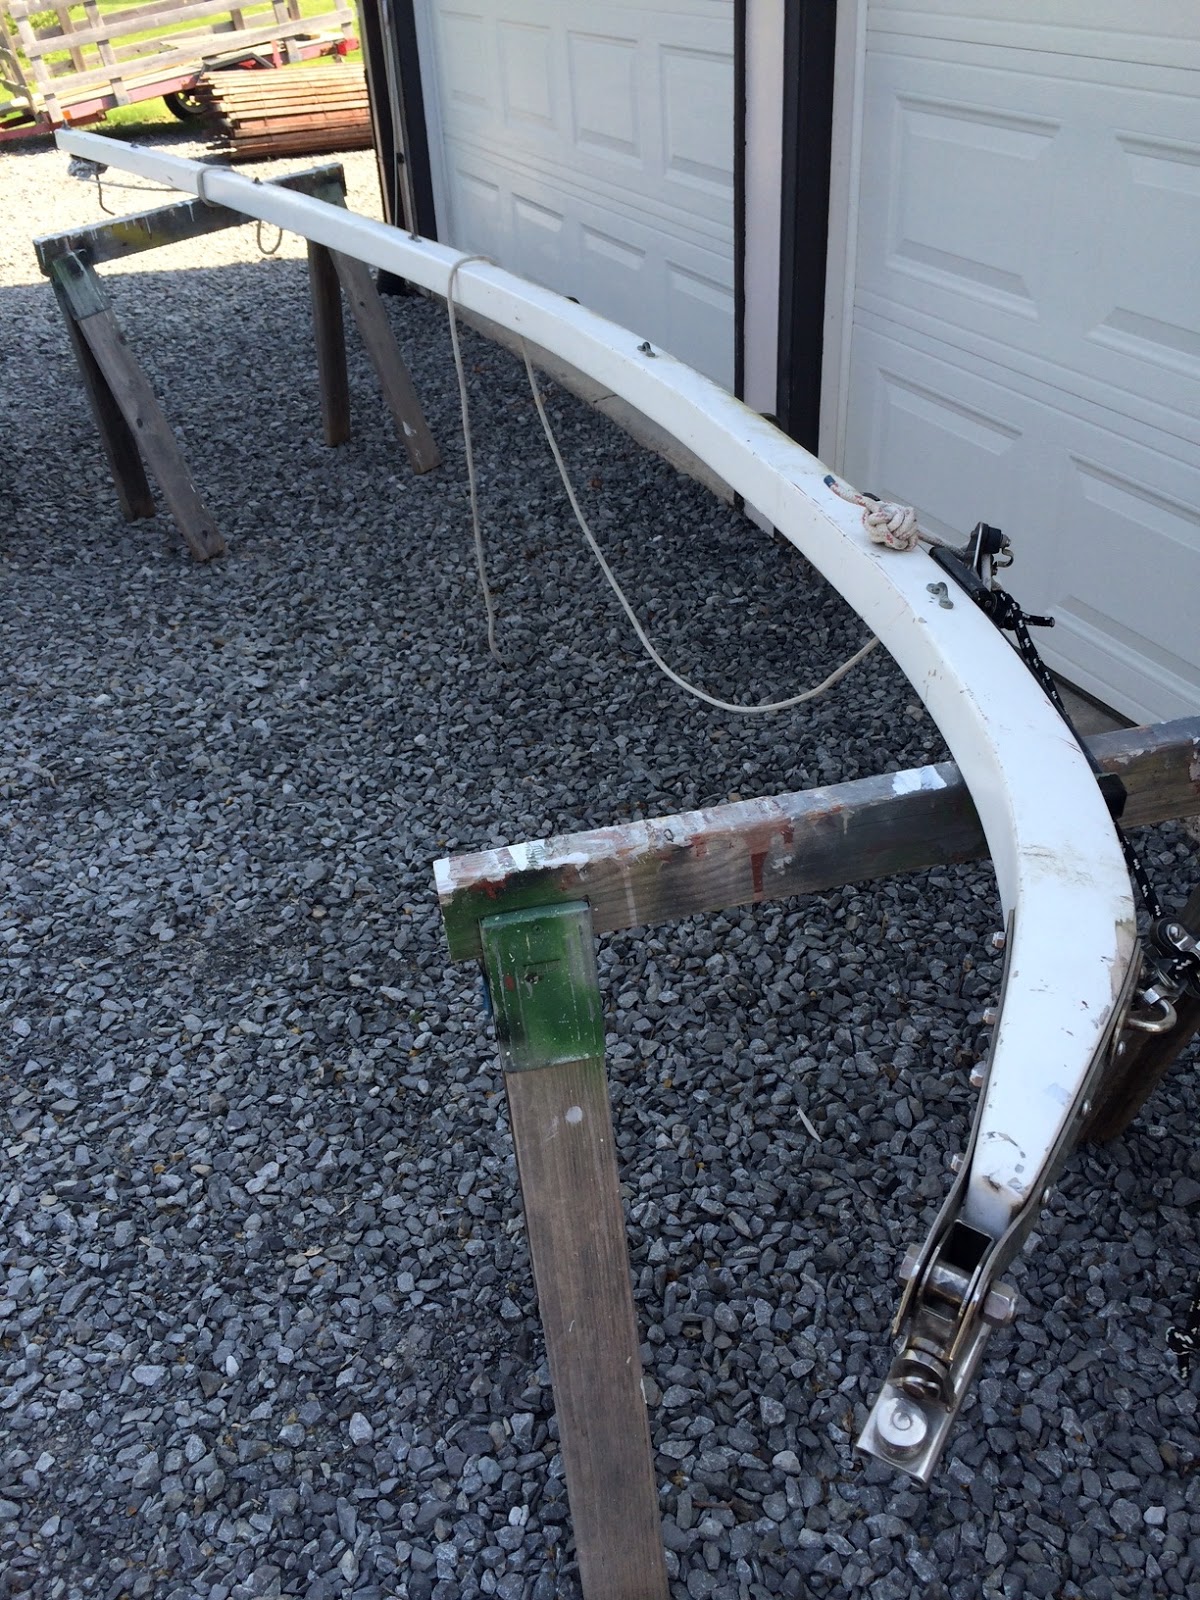
The booms are half wishbone design and easy to manage. Interestingly, I have been asked by others why my booms are broken --most likely bent from stresses placed upon the sails-- I typically use their inquiry to explain that the bent (curve) shape is part of the design of the boom.

The curve in the half-wishbone boom is designed to allow for the sail to be shaped in lite winds for more power. The booms do not fasten to the sail's bottom because the sails are "loose-footed" sails. Rather than a traditional triangle sail shape, the cat ketch sails are "half a diamond" shape.

Overtime, the booms had shown scratches, dents, worn areas, and cracks. The booms are removed from the mast and installed on the mast once a year as part of the end of the season and start of the season practice.

It was time to sand the old paint, body work, and then paint the booms. The picture toward the right displays the curve shape in the boom, and the result of sanding, body work, and painting.


I started the work on the mizzen boom first because it was the shorter of the two booms -- the main boom is approximately 15' in length. The mizzen boom had to be sanded first, then body work applied, followed by more sanding, and sandin and check and check again. -- repeat process.

The picture toward the left of mizzen boom before body work. The boom had to have all the hardware removed and the old paint. I removed the paint using a file board sander with 80 grit paper.


The picture on the right is mizzen boom after body work. Lots of areas were touched up on the boom. Notice how there is a third rope helping to hold the boom at the same angle as if it was on the boat?

There was a stress crack on the end of the mizzen boom that needed attention.

The stress crack was removed after much grinding and rebuild with glass and epoxy, followed by filler, primer and topcoat paint.

I used PreKote and Brightside paint with a flattening agent of 2:1. Having very shiny objects up on the deck spar does put a bit a strain on the eyes. 

The mizzen boom is shown hanging from rope after it had been sprayed with Brightside paint. One is mindful of the weather; I chose days when the humidity was low and the temperature was about 74 degrees.

Sanding the boom between first coat of primer and second coat was 120; between primer and first coat of topcoat was 220; between first coat of topcoat and second coat was 400.

The main boom is display toward the left. One can note the dents, scratches, and worn areas. It took about and hour to remove the hardware.


The main boom took a little bit longer to do but I also was working on improving my skills for body work. The topcoat paint did leave some orange peel look but the 400 sandpaper was the tool to remove the peel. 

The removal of the hardware took an hour and the installation of the hardward took the same amount of time. The hardware that held the lazy jack lines to the boom were replaced. They were nickel plated bronze, and the bronze looked ugly, and difficult to keep clean.

I polished the goose-neck hardware, and ensured that all screw holes into the boom had a dab of white silicon.


The main boom in the picture on the right after the topcoat has been applied. In the back ground one can note the water separator -- partly visible hanging on the wall -- and the water dryer on the hand cart. Above near the top of the roof of my garage is an exhaust fan. The air compressor, the separators, the exhaust fan and spray gun worked very well.

The legs of my spot light is also shown in the picture. When spraying white on white (paint on primer) it is very important to have good lighting. One needs to be able to see areas sprayed (too thin or too thick). 

I was pleased with the results, I only had one area that developed a run at the end of the boom. This was remedied after the paint cured a bit, then sanding, and then spray again on second coat.

The results of the approximate 25 hours of work is shown in the first picture above of this blog.