Monday, June 8, 2015

Half Wishbone Booms Get Attention

Great Ketch is a free standing mast cat ketch. The masts are carbon fiber and fiber glass.


The booms are fiber glass and contain inner blocks in areas where strength is needed, such as at the end of the boom where the lines connect to the boom.

The booms are half wishbone design and easy to manage. Interestingly, I have been asked by others why my booms are broken --most likely bent from stresses placed upon the sails-- I typically use their inquiry to explain that the bent (curve) shape is part of the design of the boom.

The curve in the half-wishbone boom is designed to allow for the sail to be shaped in lite winds for more power. The booms do not fasten to the sail's bottom because the sails are "loose-footed" sails. Rather than a traditional triangle sail shape, the cat ketch sails are "half a diamond" shape.

Overtime, the booms had shown scratches, dents, worn areas, and cracks. The booms are removed from the mast and installed on the mast once a year as part of the end of the season and start of the season practice.

It was time to sand the old paint, body work, and then paint the booms. The picture toward the right displays the curve shape in the boom, and the result of sanding, body work, and painting.


I started the work on the mizzen boom first because it was the shorter of the two booms -- the main boom is approximately 15' in length. The mizzen boom had to be sanded first, then body work applied, followed by more sanding, and sandin and check and check again. -- repeat process.

The picture toward the left of mizzen boom before body work. The boom had to have all the hardware removed and the old paint. I removed the paint using a file board sander with 80 grit paper.


The picture on the right is mizzen boom after body work. Lots of areas were touched up on the boom. Notice how there is a third rope helping to hold the boom at the same angle as if it was on the boat?

There was a stress crack on the end of the mizzen boom that needed attention.

The stress crack was removed after much grinding and rebuild with glass and epoxy, followed by filler, primer and topcoat paint.

I used PreKote and Brightside paint with a flattening agent of 2:1. Having very shiny objects up on the deck spar does put a bit a strain on the eyes. 

The mizzen boom is shown hanging from rope after it had been sprayed with Brightside paint. One is mindful of the weather; I chose days when the humidity was low and the temperature was about 74 degrees.

Sanding the boom between first coat of primer and second coat was 120; between primer and first coat of topcoat was 220; between first coat of topcoat and second coat was 400.
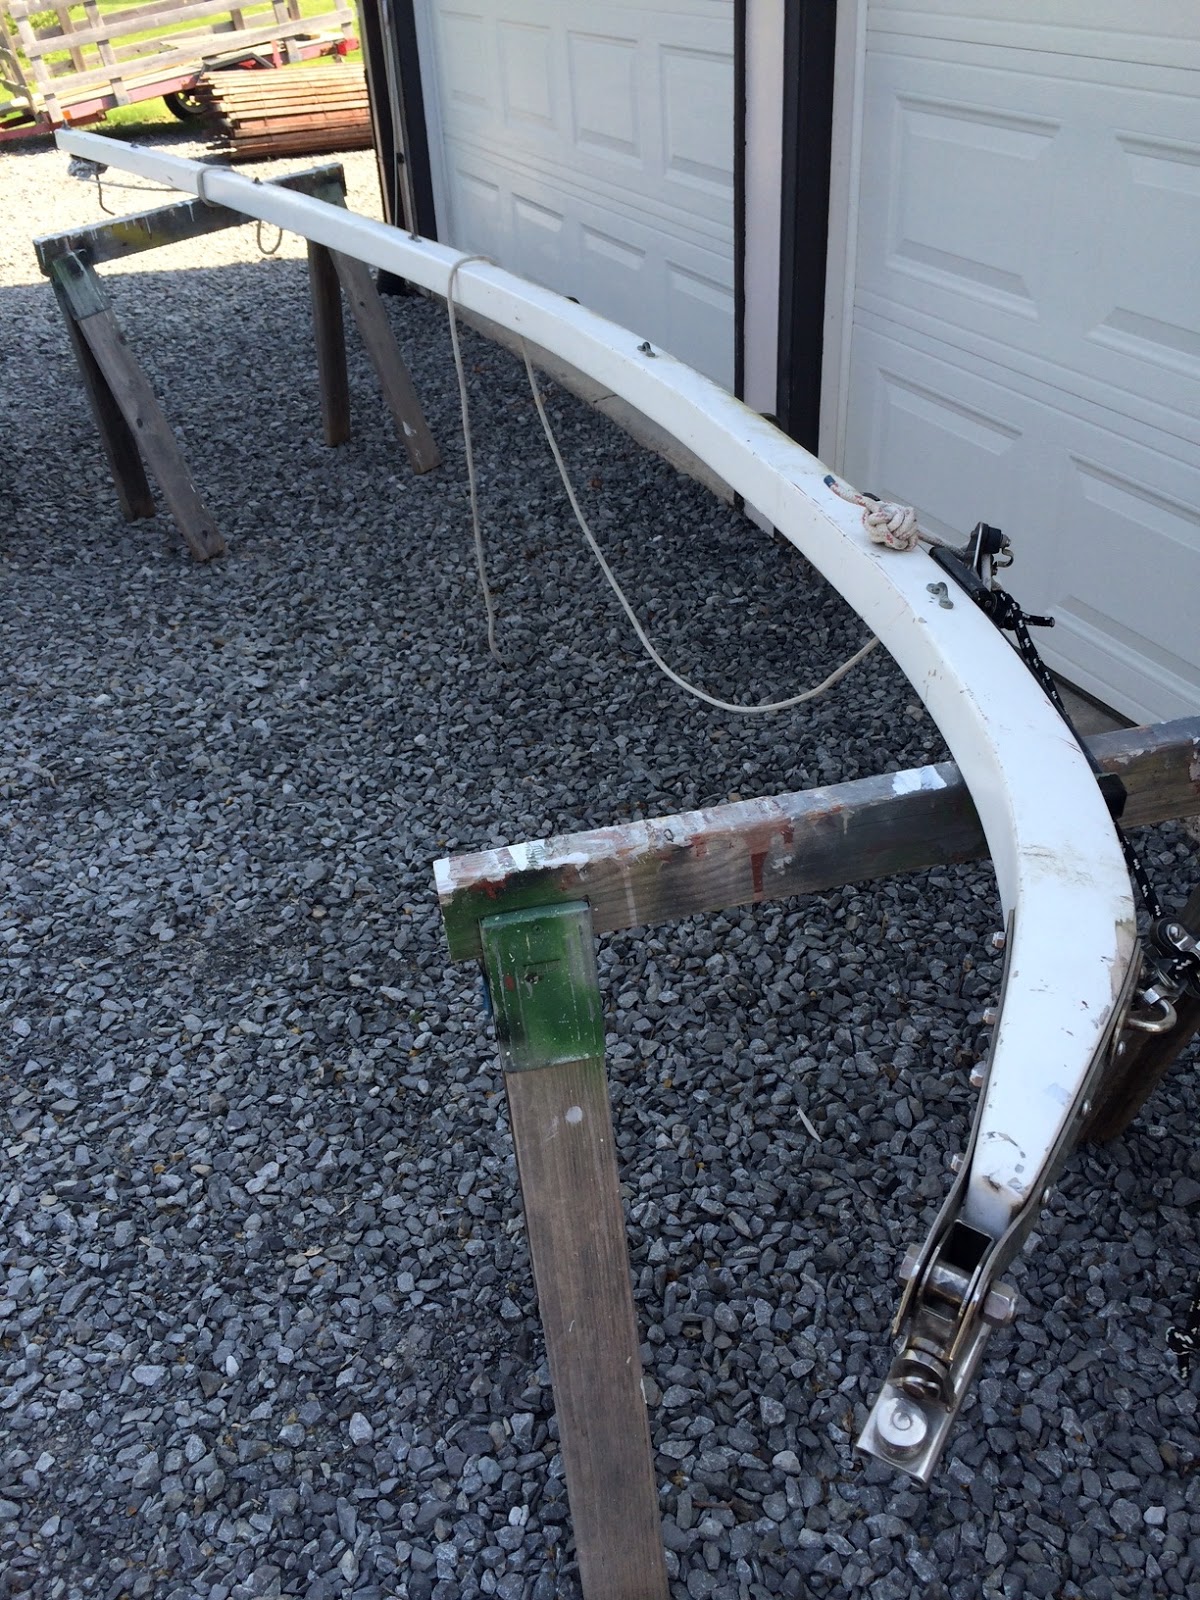
The main boom is display toward the left. One can note the dents, scratches, and worn areas. It took about and hour to remove the hardware.


The main boom took a little bit longer to do but I also was working on improving my skills for body work. The topcoat paint did leave some orange peel look but the 400 sandpaper was the tool to remove the peel. 

The removal of the hardware took an hour and the installation of the hardward took the same amount of time. The hardware that held the lazy jack lines to the boom were replaced. They were nickel plated bronze, and the bronze looked ugly, and difficult to keep clean.

I polished the goose-neck hardware, and ensured that all screw holes into the boom had a dab of white silicon.


The main boom in the picture on the right after the topcoat has been applied. In the back ground one can note the water separator -- partly visible hanging on the wall -- and the water dryer on the hand cart. Above near the top of the roof of my garage is an exhaust fan. The air compressor, the separators, the exhaust fan and spray gun worked very well.

The legs of my spot light is also shown in the picture. When spraying white on white (paint on primer) it is very important to have good lighting. One needs to be able to see areas sprayed (too thin or too thick). 

I was pleased with the results, I only had one area that developed a run at the end of the boom. This was remedied after the paint cured a bit, then sanding, and then spray again on second coat.

The results of the approximate 25 hours of work is shown in the first picture above of this blog.


Monday, July 7, 2014

Engine Work

 I took time to learn more about the Yanmar GM20FV engine in my boat. Other than performing the usual routine maintenance each year, I attended at diesel workshop that helped increase my knowledge, mechanical skills, and confidence to inspect and work on the engine more deeply. The workshop was three days; one day lecture followed by two days of hands on with an engine of the same type on a workbench. The students who attended were from all over the country and the skills and knowledge they possessed were at different levels among them.


One can easily notice the head of the engine sitting on a bench in the pictues. The engine head was cleaned by a machine shop - I had the head and heat exchanged cleaned by Kevin Ender of Enders Racing Engines. Kevin is a real pro, and gives his word about getting a job done at a specific time.

The carbon built up in the ports and valves were not extensive, and having the head off the engine gave me the opportunity to grind the valves a bit. I rented a tool from Advanced Auto that made removing the valves from the head very easy. 

The picture to the right shows the valves back in the head. The long  bolts (studs) connect to the fresh water heat exchanger. The fresh water circulating pump is also attached to the head.


While the head was off the engine it received new paint.  Some scale were found to be in the ports. The bundle in the heat exchanger was 25-35 percent blocked with scale; the tubes now clear of any debris.

The engine now has new hoses, and gaskets, and is completely cleaned and painted. Cleaning anything in the engine room takes time because of the small size of the engine room. Good thing tooth brushes do not come in large sizes.

The best part of working on one's own boat engine is getting to really know the engine and having the ability to repair it if needed when out on a voyage.

Sunday, June 22, 2014

Pulpit Finished

It has been some time since my last post and for good reason; I have been extremely busy, but more on that later.

For those who have been following this blog I thought you may be interested in having a view of the pulpit. The story about the pulpit began and is dated October 19, 2013. Please feel free to review the information in the past blog.

The pulpit wood was separated from the support bars and sanded clean. The bars were partially pitted from salt water getting in between the wood and the bars -- the previous owner had sail the Gulf often. Sanding the bars was easy when using a proper tool: a grinder with a wire brush.

The Sampson post and windlass were placed back on the pulpit once it was secure. I did make a large .25 inch thick backing plate for the windlass instead of using the same aluminum washers that were originally used.

Having a bow pulpit that is refreshed adds to the overall look of any boat.

Wednesday, April 2, 2014

Cat Ketch Sister Ship # 5 in Super Condition


S/V Dream Weaver at anchor in picture at left.

My friend, Jim, who lives in Florida showed me his Herreshoff Cat Ketch, S/V Dream Weaver. His yacht was the last of the line of these custom made by Cat Ketch Yacht (CKY) company. Hull#2 is located in Maryland, hull#3 is in New York, hull#4 and hull#5 are in Florida.  Jim has many nautical miles under his sails, and has sailed Dream Weaver to the Bahamas more than 100 times. He has also made many improvements and/or changes to the boat to accommodate his preference for cruising adventures.

The most notable change S/V Dream Weaver has are the masts. The masts are not elliptical as the original design. They are circular in shape, which makes them flex less. The stiffness means that the boat does not spill air as the original masts, and they provide power to move Dream Weaver faster on the water. As Jim wrote me "..We've been in some 10-15' quartering seas surfing at 14-18 kts in 25-40 kt winds.."  The masts have platforms for winches, and they are taller than the original masts. Both mast look new and show plenty of care.

Some  additional features of Dream Weaver are redundancy in many of its systems; water, electrical, charging, auto pilot, navigation, and safety. Moreover the interior includes some of following:  hatch hood to redirect air to forward birth, special designed latch so the deck hatch can be opened fore or aft, water maker, added foam for higher level of positive floatation, drawers in cabinets that extend to within an inch of hull -- makes use of all space, storage for 40 bottles of wine, -- Who needs drinking water eh? --    and much more. Jim has a technical spec document of all the additional features and functions that Dream Weaver contains, which can be forwarded upon request.

One can easily note that Dream Weaver has been given much attention. Although Jim, will always stay a sailor in some regard, he has recently told me that his boat is available for purchase. Any future owner of Dream Weaver will quickly realize that it is a unique boat.

Saturday, October 19, 2013

Bow Pulpit - part 1

Great Ketch is on the hard and under its winter wrap. Time for the winter boat work to commence.
During the past few years I had redone the brightwork on all the teak except the toe rail and bow pulpit. Now it is time to for the bow pulpit to get some attention.

Before the winter wrap, I removed the pulpit from the deck of the bow; 8 ss bolts and 4 ss smaller bolts held the pulpit securely to the deck; however, removing the bolts was not an easy task. The bow area under the pulpit is the anchor locker, which is its own bulkhead space. This space is not only designed to stow the anchor chain and rode, but is a safety feature; the area is three feet of space that is designed to keep water from entering the main cabin area in case of breach in the bow. Only a small hatch opening is available in the bulkhead for the purpose of inspection of the anchor locker.

In order to remove the bolts it required fastening bars on ratchets in order to extend the handle far enough to reach the nuts from the main cabin side of the bulkhead. Someone turned the bolt from above while I held fast the nut on the bolt. Removing the bolts did give my arm and shoulder a work out but the real challenge will be placing these nuts back on in the Spring when the pulpit is ready to be fastened to the deck.

The picture to the left is the pulpit without the Sampson post and without the windlass. I plan to separate the boards, and clean and brighten the wood and clean the aluminum bars. After the parts are placed together again, I will need to add strength to the bolt holes. It is apparent that years of movement when on the hook had elongated some of the holes; these holes will need to be reshaped. Perhaps epoxy and filler will allow me to redrill new holes. I am also thinking of replacing the ss washers that were used on the bolts with a ss or aluminum plate that would help spread the compression load when on the hook.

The large hole allows the rope and chain to enter the anchor locker raising the hook. Great Ketch has a 33lb Bruce anchor and 250 feet of rope. There are two other anchors that are on Great Ketch stored in the cockpit lockers both are Danforths.


Saturday, October 5, 2013

New Alternator for Great Ketch


This past summer in late August I noticed the charging light had become lit. I tightened the alternator belt and saw the charging light went off -- for two more weeks.  A test with a multimeter on the battery indicated that when the Yanmar was not running the voltage was approximately at 12volts, and when engine was operating.

The alternator needed to be replaced. I checked the cabling and confirmed them to be sound. The original Hitachi alternator had to be replaced. I purchased a new alternator from www.spidermarine.com. The replacement alternator was rated at 60amps -- the label on the box said it was an Hitachi 12v 60amp #A12107 -- which is 5 more amps than the previous Hitachi 55amp model. I needed to replace the alternator belt with a longer belt because the form factor of the new alternator was slightly larger than the old model.

After the alternator was installed I tested the charging: 12 volts on the battery with the engine not running; 13+ volts with the engine running. The new alternator was working and the absence of a lit charging light also indicated same.

Considering the original alternator was part of the build in 1988 of Great Ketch, I think the alternator served her well.


Note: The picture above displays the old 55amp Hitachi alternator next to the new 60amp Hitachi alternator.


Thursday, June 20, 2013

Free Standing Carbon Fiber Masts


Free Standing Masts on the Great Ketch inevitably becomes a topic of conversation at my marina because it is the only boat in the marina with free standing masts. Great Ketch may very well be the only cat ketch boat with free standing masts on the entire lake of Oneida.


I recently was contacted by someone interested in learning about Cat Ketches because he was interested in purchasing one. His interest was with a 38 foot Herreshoff Cat Ketch made in 1983.
We spoke and emailed a few times a shared questions and answers, and it was soon after our last phone call that a day later I discovered a recorded interview with Eric Sponberg, who designed the free standing carbon fiber masts for the Herreshoff cat ketch boats built by John Newton of Cat Ketch Yachts. The web site where I located the Eric Sponberg interview is at http://proboatradio.com/2012/05/17/free-standing-rigs/ the proboatradio.com site.

For those looking for details about free standing masts and those designed by Eric Sponberg, I recommend visiting his home page web site http://www.sponbergyachtdesign.com/.

The two most regarded benefits of free standing masts are safety and better sail shape.